Imagine the joy on your child’s face when their favorite baby doll gets a stylish new ride. You can make this happen by crafting a charming canopy for a baby doll stroller.
This simple yet delightful project is not just about enhancing the doll’s stroller; it’s about creating memories and sparking creativity. By diving into this fun DIY adventure, you can transform a regular stroller into a cozy and fashionable haven for your little one’s cherished doll.
Plus, it’s a perfect opportunity to bond with your child as you work together on this creative task. You might think it sounds complex, but you’ll be surprised at how easy it is to make a canopy with just a few materials and some imagination. In this guide, you’ll discover step-by-step instructions that will help you create a canopy that is both functional and beautiful. You’ll learn how to choose the right fabrics, how to attach the canopy securely, and how to add those little touches that make it uniquely yours. So, why wait? Dive in and explore how you can turn an ordinary baby doll stroller into a magical little carriage, ready to spark endless hours of imaginative play.
Credit: www.kohls.com
Materials Needed
Creating a canopy for a baby doll stroller can be a fun project. It requires a few simple materials and a bit of creativity. This DIY activity is perfect for those who love crafting and want to personalize their doll accessories. Let’s explore the materials needed to bring this project to life.
Recommended Products

DOUBLE THE FUN WITH A TWIN DOLL STROLLER - Let kids take two dolls or stuffed animals along for the ride with this folding double stroller. Promotes creativity, social interaction, and pretend play. Compatible with Girl dolls and other popular 18-inch characters.

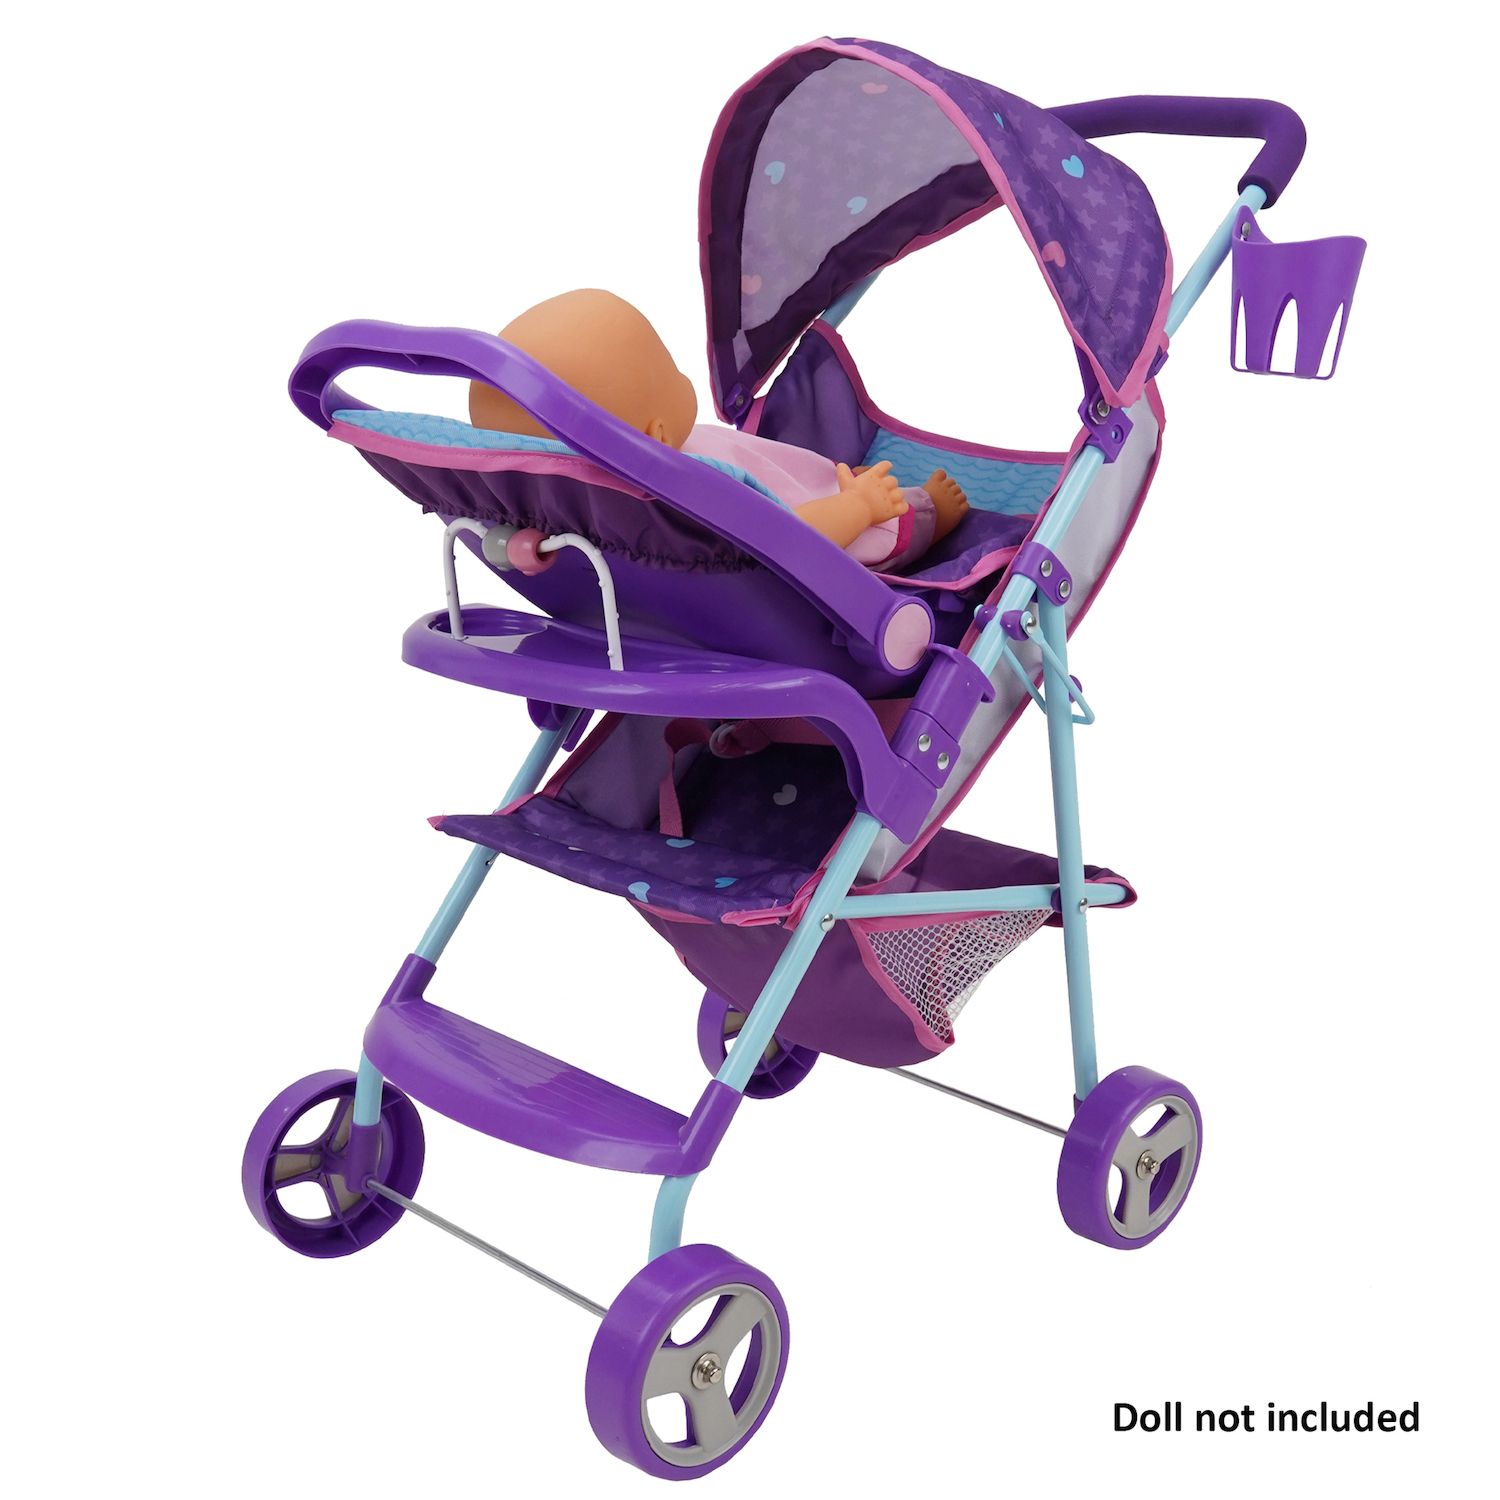
Premium Baby Doll Stroller for Kids: The baby doll stroller measures 21" in height and includes a functional canopy that easily opens and closes. Designed with quality in mind, this toy stroller for toddlers 3+ is both sturdy and durable, ensuring hours of play. The baby stroller for dolls folds up compactly for convenient storage when not in use.

Vibrant Design: Features bright pink and rainbow colors that captivate children's attention and encourage imaginative playtime adventures.
Fabric Selection
Choose a lightweight fabric that is easy to handle. Cotton or polyester works well. The fabric should be colorful and appealing to children. Ensure it is durable to withstand playtime.
Measuring Tape
A measuring tape is essential for accurate dimensions. Measure the stroller’s width and length precisely. This ensures the canopy fits perfectly.
Scissors
Sharp scissors make cutting fabric easier. Use them to trim the fabric to the required size. Neat edges give the canopy a polished look.
Needle and Thread
Needle and thread are necessary for sewing the fabric. Choose a thread that matches the fabric color. Strong stitches ensure the canopy stays intact.
Elastic Band
An elastic band helps attach the canopy securely. Measure the band to fit around the stroller frame. Elastic ensures flexibility and easy removal.
Decorative Items
Add decorative items like ribbons or buttons. These enhance the canopy’s appearance. Choose child-friendly decorations for safety.
Measuring The Stroller
Measuring the stroller is essential to create a perfect canopy for your baby doll’s stroller. It ensures the canopy fits well and provides ample shade. Accurately measuring the width and the height allows you to tailor the canopy to match the stroller’s dimensions.
When crafting a canopy for your baby doll stroller, the first step is all about getting the measurements right. This crucial step ensures that your canopy fits snugly and looks professionally done. Whether you’re a seasoned DIY enthusiast or a newcomer to crafting, precise measurements set the foundation for a successful project. Have you ever started a project only to realize halfway through that something doesn’t quite align? This guide will help you avoid those pitfalls.
Understanding The Dimensions
Start by identifying the key parts of the stroller you need to measure. Focus on the length and width of the area where the canopy will be attached. Use a flexible tape measure for accuracy. Think about how the canopy will drape and whether you want it to cover the sides or just the top.
Gathering Your Tools
Before you begin, gather essential tools like a tape measure, notebook, and pen. These will help you record dimensions clearly, avoiding any miscalculations later. Additionally, consider having a camera or smartphone handy to take reference photos. This can be especially helpful if you’re juggling multiple projects or if interruptions are common.
Measuring Tips and Tricks
Be sure to measure twice to ensure accuracy. It’s better to catch a mistake now than after cutting fabric. If you’re unsure about a measurement, ask a friend or family member to double-check it with you. And if you’re feeling adventurous, try experimenting with different canopy shapes using scrap paper first. This can spark creativity while also confirming your measurements.
Adjusting For Variability
Consider the variability of different stroller models. Not all strollers are created equal, and yours may have unique features that affect the canopy’s fit. For instance, some strollers have curved handles that could influence the canopy’s dimensions. Think about whether these features add to the stroller’s charm or pose a design challenge.
Finalizing The Measurements
Once you’ve taken all the necessary measurements, review them to ensure consistency. Are the numbers logical, and do they align with your vision for the canopy? If everything checks out, it’s time to move forward with confidence. Knowing your dimensions are accurate gives you the freedom to be creative without worry. So, are you ready to transform your baby doll stroller with a custom canopy? With careful measuring, you’re well on your way to a delightful addition that both you and your little one will adore.
Cutting The Fabric
Creating a canopy for a baby doll stroller is a fun project. It adds charm and a personal touch to your child’s playtime. One of the key steps is cutting the fabric accurately. This ensures the canopy fits well and looks good. With the right tools and techniques, this task becomes easy and enjoyable. Let’s dive into how to cut the fabric perfectly.
Recommended Products

My First Doll Stroller With Hood, Seat Belt, And Basket On The Bottom
Secure Fastening System: Integrated seat belt keeps dolls safely positioned during imaginative adventures, giving parents peace of mind while children enjoy extended pretend play scenarios

TOY STROLLER FOR TODDLERS: Recommended for big kids & preschool children, this 28” baby toy stroller is the must-have baby doll stroller for 2+ year old girls. It’s even big enough to be used as a doll stroller for 5 year old girls or 6 year old girls who collect bigger 18” dolls
Choosing The Right Fabric
Select a durable yet soft fabric for the canopy. Cotton or polyester works well. These materials are easy to handle and maintain. Choose a pattern or color your child loves. This makes the canopy more appealing.
Measuring The Dimensions
Accurate measurements are crucial for a perfect fit. Use a measuring tape to determine the stroller’s dimensions. Note the width and length required for the canopy. Add an extra inch on each side for seam allowance.
Marking The Fabric
Lay the fabric flat on a clean surface. Use chalk or a fabric marker to outline the measurements. Ensure the lines are straight and clear. This step prevents mistakes during cutting.
Using The Right Tools
Sharp scissors or a rotary cutter are essential for clean cuts. Dull tools can fray the fabric edges. Keep the tools handy and in good condition. This ensures smooth and precise cutting.
Cutting With Precision
Follow the marked lines carefully while cutting. Hold the fabric firmly to avoid shifting. Take your time to ensure clean edges. This step affects the final look of the canopy.
Double-checking The Pieces
After cutting, lay the pieces out and double-check their size. Compare them with the stroller measurements. Make any necessary adjustments before proceeding. This prevents fitting issues later on.
Sewing The Canopy
Crafting a canopy for a baby doll stroller is a delightful project. Begin by measuring the stroller to ensure a perfect fit. Choose soft fabrics and vibrant colors to create a charming accessory. This personalized touch enhances the stroller’s appeal and provides a cozy spot for a beloved doll.
Sewing the canopy for a baby doll stroller is not only a delightful craft project but also a wonderful opportunity to personalize your child’s playtime experience. Imagine the joy in your child’s eyes when they see their doll stroller adorned with a charming, homemade canopy. This section will guide you through the sewing process with simple, actionable steps. Whether you’re a sewing novice or a seasoned pro, creating a canopy can be a rewarding and straightforward task.
Recommended Products

DESIGNED FOR 18 TO 20 INCH DOLLS: Perfectly accommodates collectible dolls and similar-sized toys, providing a delightful stroller experience for your child’s favorite dolls.

CUTESY CORAL FLOWER PRINT: Perfect for playtimes & playdates inside or outside, our toy stroller for toddlers is cute & durable enough for indoor or outdoor use. The tandem seats & retractable sun shield canopy are both made from a super stylish & trendy vintage floral print fabric & bright strawberry red trim add a pretty, girly touch.

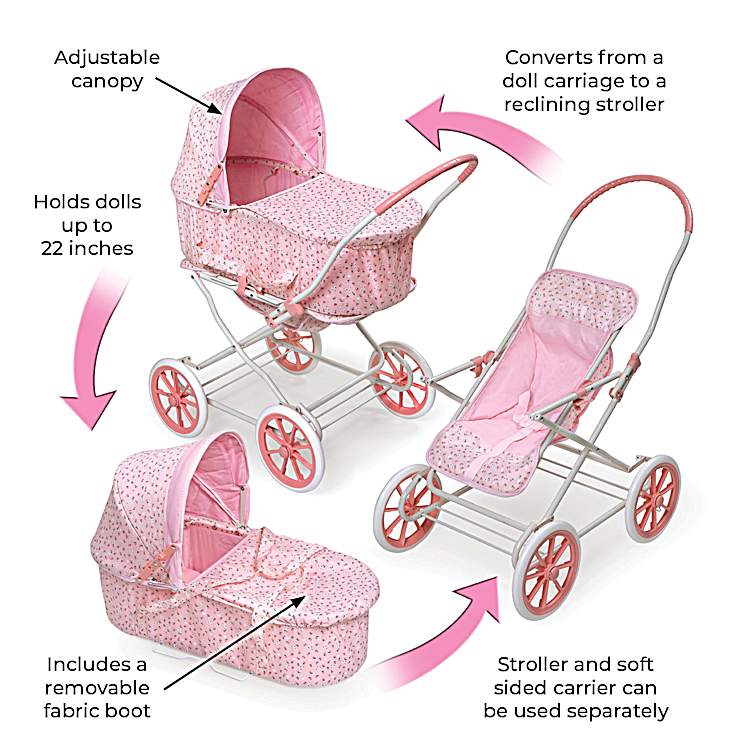
DELUXE 2-IN-1 STROLLER: Realistic, pram-style doll stroller with detachable bassinet for dolls up to 18" long
Gathering Your Materials
Start by collecting all the necessary materials. You’ll need fabric, scissors, a sewing machine, thread, and pins. Opt for a fabric that complements the stroller’s color. Choose soft, durable material, like cotton or linen, that can withstand playful adventures. Do you have a favorite fabric that holds special memories? Consider using it to add a personal touch to the canopy. Measure the stroller to determine the dimensions for the canopy. It’s crucial to get these measurements right to ensure a perfect fit. Cut the fabric according to the dimensions, leaving a small margin for sewing. Would you like a ruffled edge? If so, cut the fabric slightly larger to accommodate this decorative touch.
Pinning The Pieces
With the fabric cut, it’s time to pin the edges together. This will help keep everything in place while you sew. Ensure the fabric is aligned properly to avoid uneven seams. Have you ever experienced the frustration of a lopsided project? Pinning carefully can prevent this common pitfall.
Sewing The Edges
Set up your sewing machine and thread it with matching-colored thread. Start sewing along the pinned edges. Use a straight stitch for a clean, professional look. Are you worried about making mistakes? Remember, sewing is a skill that improves with practice.
Adding Decorative Touches
Once the basic canopy is sewn, consider adding decorative elements like lace or ribbons. These details can enhance the canopy’s charm and make it truly unique. What creative embellishments can you think of to make the canopy stand out?
Final Adjustments
Try fitting the canopy onto the stroller to see how it looks. Make any necessary adjustments for a snug fit. Ensure the canopy is secure and functional, ready to withstand hours of play. Have you ever completed a project and felt that sense of accomplishment? Embrace that feeling as you admire your finished canopy. Creating a canopy for a baby doll stroller is a fulfilling craft that combines creativity with functionality. Dive into the sewing process with enthusiasm, and you’ll not only craft a charming canopy but also create lasting memories.
Attaching To The Stroller
Crafting a canopy for a baby doll stroller is a fun and simple project. Gather fabric and some basic sewing tools. Secure the canopy to the stroller using Velcro or ties. It provides shade and adds charm to your child’s playtime.
Creating a canopy for a baby doll stroller is a delightful project that adds a personal touch to your child’s playtime. Once you have crafted the canopy, the next step is attaching it securely to the stroller. This part is crucial to ensure the canopy not only looks good but also stays in place during your child’s imaginative adventures. Let’s dive into the steps to attach your canopy with ease and precision.
Preparing The Stroller For Attachment
Begin by examining the stroller. Identify where the canopy will attach. Most strollers have a frame or handle that can support the canopy. Ensure the stroller is clean and free from dust. This will help the canopy attach better. Check if you need any additional tools like clips or Velcro strips.
Aligning The Canopy
Align your canopy with the stroller, ensuring it covers the desired area. Hold it in place to see how it fits. Adjust the fabric for an even look. This step is essential for ensuring the canopy is not lopsided. Does it look balanced from all angles?
Using Fasteners For A Secure Fit
Choose fasteners that are easy to use. Velcro strips or small clips work well. Attach them to the edges of the canopy. Fasten the canopy to the stroller’s frame. Ensure it holds securely but is easy to remove if needed. Is it tightly fastened without being too taut?
Testing The Stability
Once attached, gently push the stroller around. Observe if the canopy stays in place or shifts. Make necessary adjustments if it seems loose. A stable canopy makes playtime more fun and worry-free. Can you imagine the joy on your child’s face with a perfect setup?
Personalizing For Fun
Consider adding decorative elements. Small bows or patches can add a personal touch. These additions make the canopy uniquely yours. Encourage your child to help choose these decorations. What better way to bond and create memories? Attaching a canopy to a baby doll stroller is not just about functionality. It’s a chance to engage with your child, fostering creativity and problem-solving skills. Enjoy the process and cherish the smiles it brings!

Credit: www.amazon.com
Decorative Finishing Touches
Create a charming canopy for a baby doll stroller using fabric and ribbons. Attach the fabric securely to the stroller frame for a snug fit. Add ribbons and lace to enhance its decorative appeal, making playtime more magical and fun.
Decorative finishing touches can transform a simple baby doll stroller canopy into a delightful work of art. These small additions not only enhance the visual appeal but also add personality and charm. You can make your canopy unique by choosing elements that reflect your personal taste or your child’s preferences.
Choosing The Right Fabric
Select a fabric that stands out. Bright colors or playful patterns can make your canopy eye-catching. Consider materials like satin or cotton for a soft and elegant finish. Think about what would make your child’s doll stroller special.
Adding Trim And Lace
Trim and lace can add a touch of sophistication. Choose from options like ribbon, lace, or pom-pom trim. These can be sewn or glued along the edges of the canopy. What type of trim would complement your fabric choice?
Embellishments For Extra Flair
Embellishments like buttons, sequins, or small fabric flowers can bring your canopy to life. Attach these using fabric glue for easy application. Do you want your canopy to sparkle or have a subtle elegance?
Personalized Embroidery
Embroidery can make the canopy truly unique. You might stitch your child’s name or a favorite design onto the fabric. This personalized touch can make the stroller feel more special to your child. What design would make your child smile every time they see their stroller?
Colorful Paint Or Fabric Markers
Using paint or fabric markers can allow for creativity. You can draw patterns or images directly onto the fabric. It’s a fun way to involve older children in the decorating process. Imagine the joy of seeing your child’s artwork on their doll’s stroller!
Using DIY Stickers
Stickers offer a quick and easy way to decorate. Choose from various themes, such as animals or stars, to adorn the canopy. They’re simple to apply and can be replaced if needed. Would stickers make the decorating process more enjoyable for you and your child?
Incorporating Seasonal Themes
Changing decorations with the seasons can keep things exciting. Think about adding snowflakes for winter or flowers for spring. This keeps the canopy fresh and relevant throughout the year. How can you adapt your canopy to reflect the current season? Each decorative touch adds to the canopy’s charm, making it a source of joy for your child and a unique project for you. Consider these options and let your creativity shine.

Credit: www.amazon.com
Frequently Asked Questions
What Materials Do I Need For A Canopy?
You will need fabric, measuring tape, scissors, pins, thread, and a sewing machine (or a needle for hand sewing), plus fasteners like Velcro or elastic bands. Simple and easy.
How Do I Choose The Right Fabric?
Choose light, breathable fabric. Cotton works well. Avoid heavy materials for safety.
How Do I Attach The Canopy To The Stroller?
Use Velcro or elastic bands. These hold the canopy securely.
Can I Make A No-sew Canopy?
Yes, you can use fabric glue. It’s quick and easy.
How Long Does It Take To Make A Canopy?
It usually takes around one hour, depending on your sewing skills.
Is It Safe To Make A Homemade Canopy?
Yes, if you use light materials and secure it well. Safety first.
Conclusion
Creating a canopy for your baby doll stroller is simple and fun. It adds a special touch to your child’s playtime. You need basic materials like fabric and scissors. Follow the steps carefully for a perfect fit. Let your creativity shine with colors and designs.
Your child will love the new look of the stroller. This project encourages imagination and hands-on skills. Spend quality time together while crafting this unique accessory. Enjoy watching your child play with their improved toy. Happy crafting!