
Removing a Nuna car seat from its base is easier than most parents expect. It takes just a few seconds once you know where the release button is. Nuna’s infant car seats (like the PIPA series) click into a base that stays installed in your vehicle, so the carrier snaps in and out quickly. Infant seats are designed as “rear-facing only” carriers with detachable bases. Experts recommend keeping kids rear-facing as long as possible (see current guidance from the AAP and CDC).
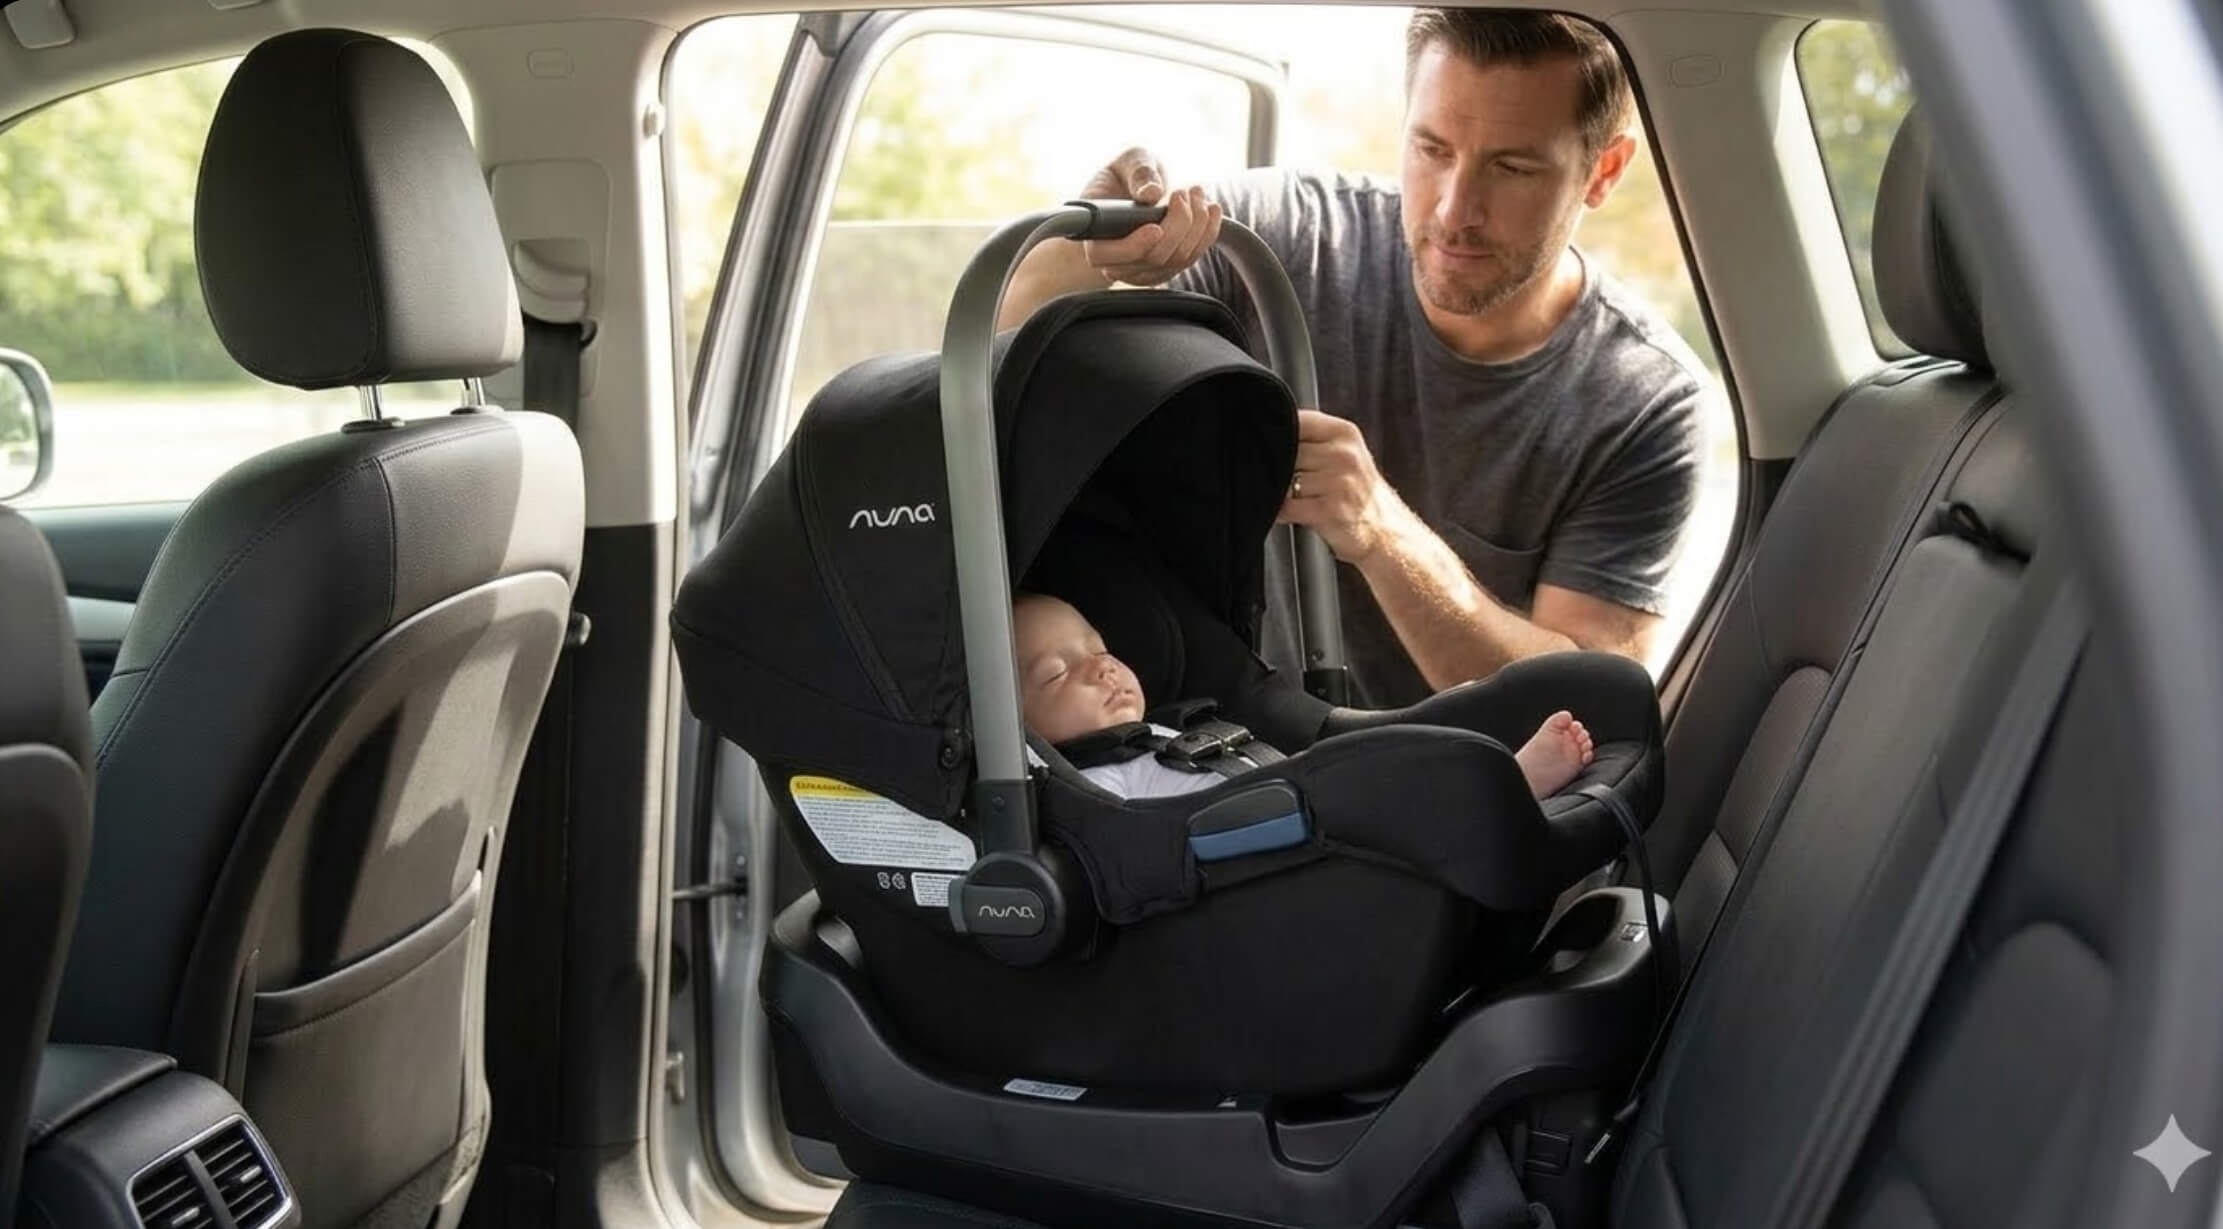
This setup simplifies daily life. You can carry your baby in the seat or switch it to a stroller without reinstalling anything.
Quick Answer
- Park on level ground, set the car to “Park,” and lock the carrying handle upright.
- Press the seat down into the base until you hear a click (confirms it’s latched).
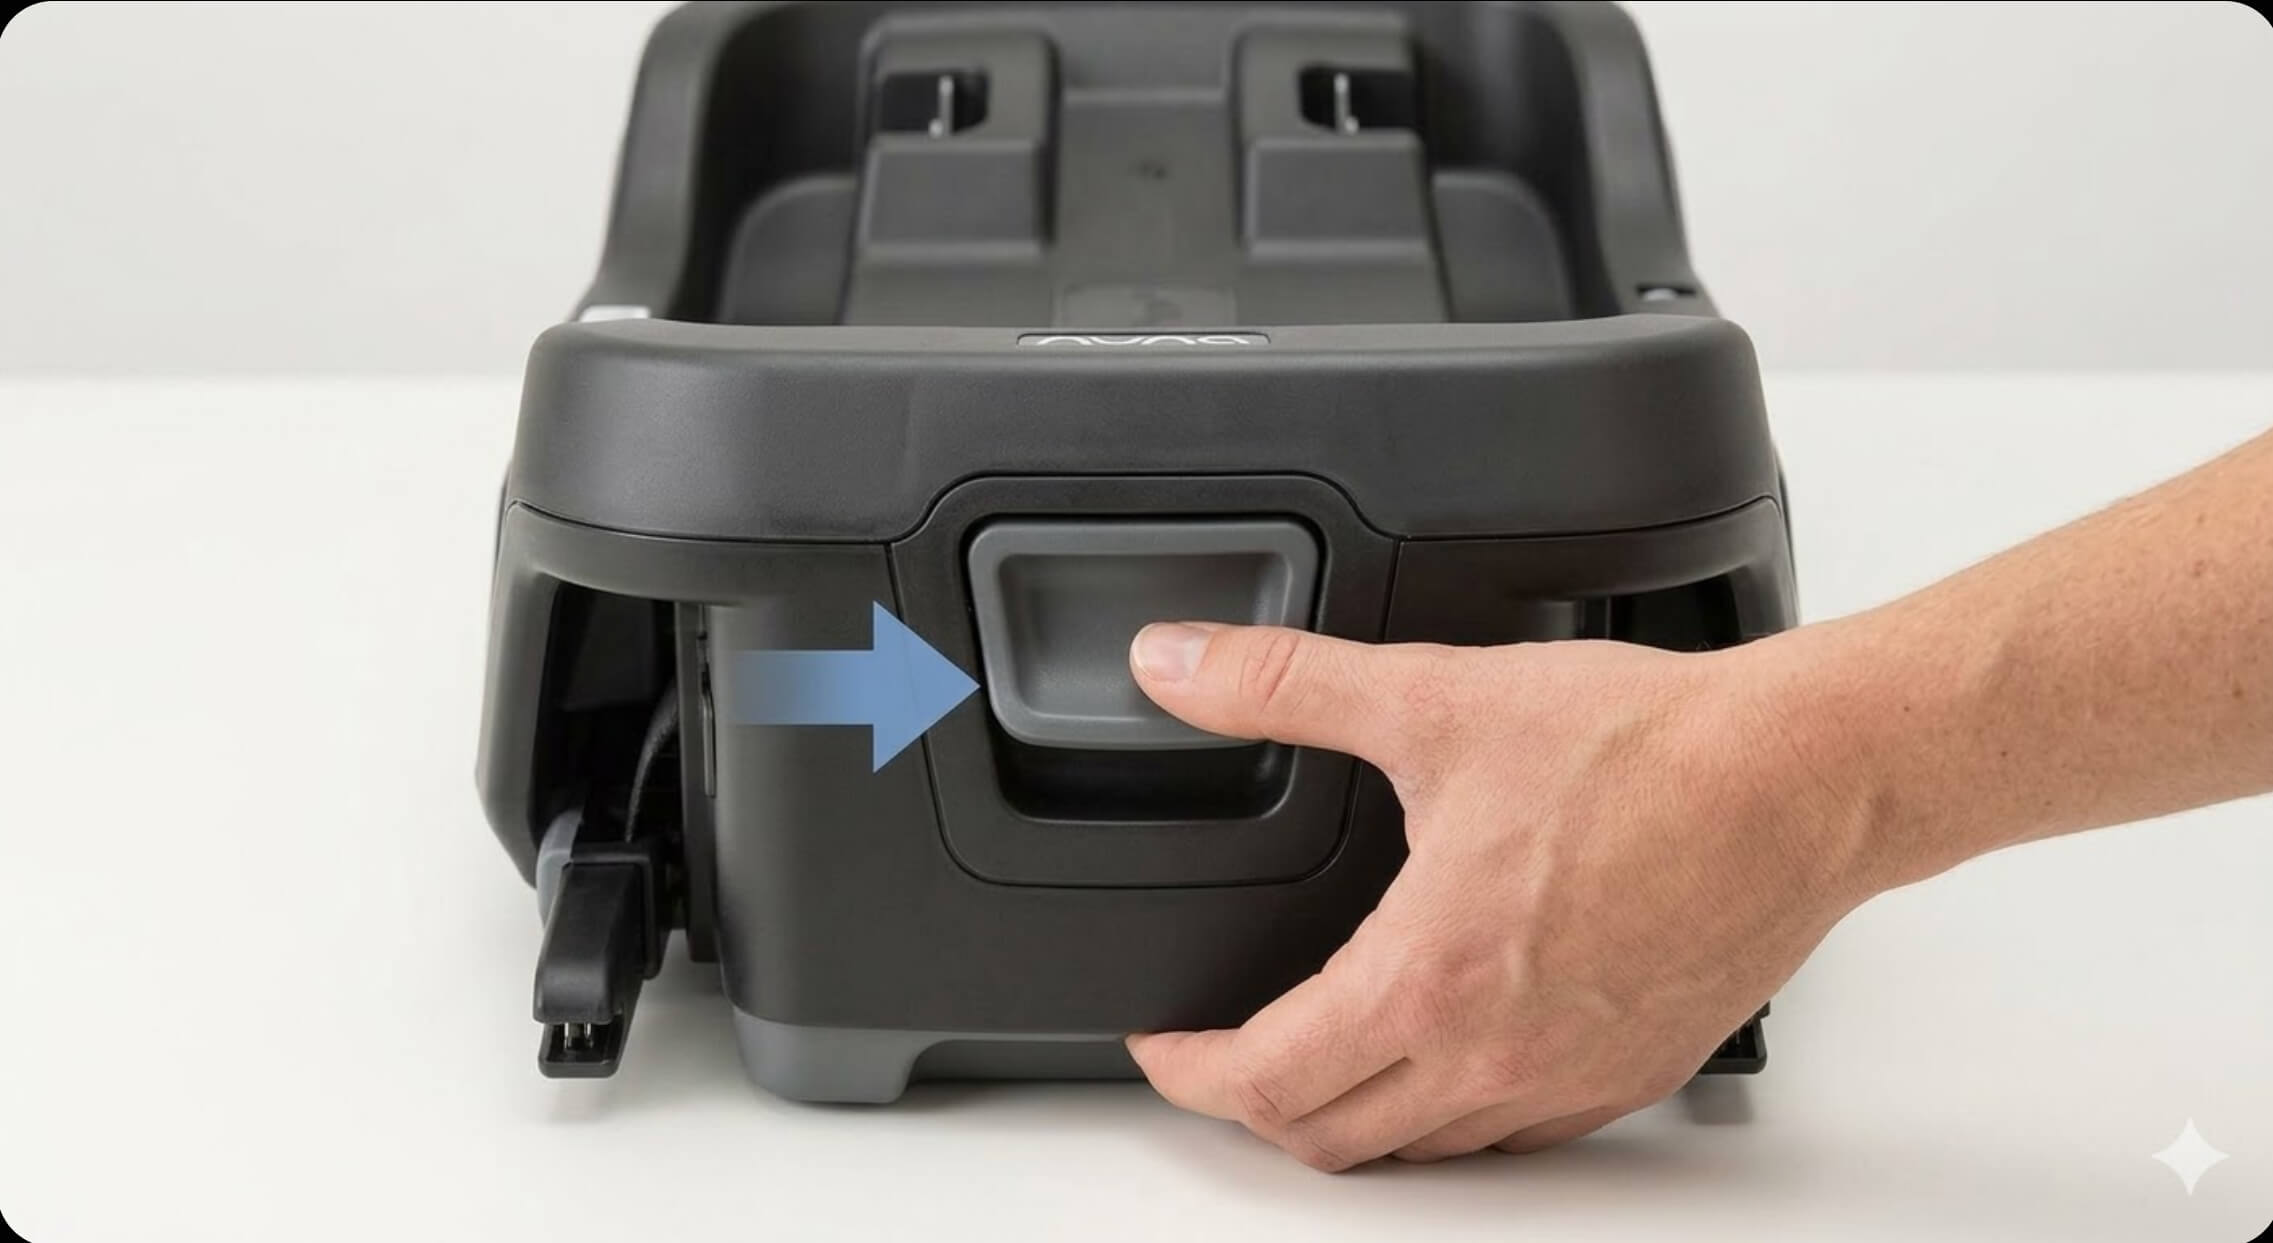
- Find the release button on the back of the base (usually red or gray) and squeeze it firmly.
- While holding the release, lift the carrier straight up off the base.
- Your baby can stay safely buckled in the seat during removal.
- The process is the same for PIPA, PIPA Lite, and PIPA RX models, with minor differences in button placement.
In this guide, you’ll learn how to remove the Nuna car seat from its base for popular models like the PIPA, PIPA Lite, and PIPA RX with the RELX base. We’ll also cover safety tips, troubleshooting, and practical situations where you might need to detach the seat.
What Happens when you Remove Nuna Car Seat from its Base?
There are plenty of everyday moments when you’ll need to remove the Nuna car seat from its base. Many parents also wonder whether an infant car seat or convertible car seat is the better choice. You might want to bring your baby inside without waking them, especially if you’re heading to a doctor’s appointment or just carrying them upstairs. One of the best things about Nuna seats is their compatibility with strollers for those who love traveling. You can pop the seat out of the car and click it right onto the stroller frame without any fuss.
Switching between vehicles is another common reason to detach the seat. If you’re using a second family car or hopping into a rental, removing the carrier (and even the base) allows for a quick transition. Cleaning is easy too: lifting the seat off makes it simple to vacuum under the base or remove the fabric for washing. And when you’re traveling by taxi or airplane, detaching the seat and carrying it on board can make your trip much smoother.
In all of these cases, the process is the same: press the release button, lift the carrier, and you’re good to go. Make sure your baby is securely buckled in during removal, unless you plan to take them out first. Always check that the seat is properly clicked into the base before driving.
Step-by-Step: Removing a Nuna PIPA (or PIPA RX/RELX) Infant Seat
For the Nuna PIPA RX with the RELX base, the release mechanism is built into the base itself. Follow these steps:
Recommended Products

As Seen on Shark Tank, the car seat clip opener that eliminates thumb pain and broken nails from unbuckling a child or toddler car seat for parents, grandparents and all caregivers

As Seen on Shark Tank, the car seat clip opener that eliminates thumb pain and broken nails from unbuckling a child or toddler car seat for parents, grandparents and all caregivers

As Seen on Shark Tank, the car seat clip opener that eliminates thumb pain and broken nails from unbuckling a child or toddler car seat for parents, grandparents and all caregivers
Secure the vehicle and handle:
Make sure your car is parked on level ground and set to “Park.” Position the infant carrier’s handle in the upright carry position and confirm it’s locked in place. An unlocked handle can swing around unexpectedly, so always lock it before lifting the seat. Nuna allows any locked handle position while driving (see Nuna FAQ).
Verify the seat is latched:
Press down on the car seat in its base until you hear or feel a click. This confirms the seat is fully engaged in the base.
Press the release button:
Find the release button on the back of the base. It’s usually a red or gray tab. Give it a firm squeeze (per Nuna manuals, squeeze the child restraint release button, then pull the child restraint up: PIPA Series Base manual; PIPA RX manual).
Lift the carrier off:
While holding the release, lift the infant carrier straight up out of the base. It should detach smoothly. If it feels stuck, double-check that you’re pressing the release all the way in.
Carry your baby out:
Keep holding the handle in the locked position and lift the seat out of the car. Make sure your little one is safely buckled inside. Once detached, you can adjust the handle to a comfortable carrying angle.
All these steps follow Nuna’s official instructions. The manual states: squeeze the car seat release button and then pull the child restraint up (Nuna PIPA Series Base manual).
Step-by-Step: Removing a Nuna PIPA Lite Infant Seat
The Nuna PIPA Lite (and PIPA Lite RX) works almost the same way. Here’s how to remove it:
- Check handle position: Lock the handle in the carry position (upright).
- Verify latch: Press down on the carrier and listen for a click to confirm it’s latched to the base.
- Squeeze the base button: Locate the carrier release button on the PIPA Lite base. Squeeze it firmly. You may see two buttons for the rigid LATCH connectors on either side.
- Pull up the seat: While squeezing, lift the carrier straight up from the base. The seat will pop off.
The PIPA Lite manual also suggests pushing the base toward the vehicle seat as you press the latch release levers. This can make removal easier. The core action stays the same: lift the child restraint up while pressing the carrier release button.
For both models (PIPA and PIPA Lite), your infant can safely stay buckled in the seat during removal. You don’t need to loosen the harness unless you plan to take the child out first. Always lift by the handle or sides of the carrier, never by the canopy or straps.
Recommended Products

4-position adjustable base helps ensure an accurate install and helps keep baby comfortable as he or she grows

Compatible EZ-Lift Plus base designed for secure click-in attachment

For use with the Safety 1st onBoard35 LT infant car seat
Using a Nuna Car Seat Without the Base
Some situations call for using the Nuna infant car seat without its base. If you’re in a taxi, rideshare, or rental car, you may not have a base available. Certain Nuna models, including the PIPA, PIPA RX, and PIPA Lite RX, can be installed using just the vehicle’s seat belt. Thread the lap and shoulder belt through the designated belt path on the carrier, buckle it, and pull the belt tight. Check your specific model’s manual for the exact belt routing, since the path location can vary. Keep in mind that some Lite variants (PIPA Lite, Lite LX, Lite R) require the base and cannot be installed without it. The NHTSA car seat guide is a helpful resource for general installation tips and safety standards.
Tips and Safety Advice
Removing the Nuna seat from its base should be straightforward and safe. Keep these tips in mind:
Follow Nuna’s instructions:
Always read the user manual. It includes crucial safety steps and weight/height limits. Never skip the release step, and do not modify any part of the seat (manual).
Keep child rear-facing:
Nuna PIPA seats are for rear-facing use only. The AAP and CDC recommend keeping babies rear-facing as long as possible, until they reach the seat’s height or weight limits (AAP policy; CDC resources).
Stationary vehicle:
Park the car on a level surface and apply the parking brake. Don’t remove the seat on an incline or with the engine running.
Lock the handle:
Lock the carrying handle in the carry (upright) position before lifting. An unlocked handle can shift and become a hazard.
Check surroundings:
Make sure nothing blocks the infant carrier’s movement. Check that the front seat isn’t too close and that no heavy items are sitting on the base.
Maintain the base in car:
Nuna bases are designed to stay installed. Unless you need to remove it for cleaning or travel, keep the base level and secure so the seat will always click in properly.
Inspect latch and belts:
After removing and later reinstalling the seat, always confirm it clicks securely and doesn’t move more than 1 inch side-to-side. Check the rigid LATCH connectors (if used) or seat belt lock-off for proper engagement.
A certified child passenger safety technician (CPST) can also inspect your installation for free. You can find one near you through Safe Kids Worldwide.
Never force the seat out. If the release button is stiff or the seat won’t budge, double-check that you’re pressing in the right place and that any safety locks (like a belt lock-off) are disengaged. Refer to the manual or a certified car seat installer for help if something seems jammed.
Troubleshooting Common Removal Issues
Even with practice, parents sometimes run into problems. Knowing what to expect makes it easier to fix. Here are common issues and solutions:
Recommended Products

LITEMAX ACCESSORY BASE: To be used ONLY with LiteMax Infant Car Seats

Infant car seat helps protect rear-facing infants 4-30 lb and up to 32"

Easy Installation: Built-in Insta-Install Rigid LATCH installs safely in any car in seconds *Stay-in-car base is available for purchase; however, it is not required for install
Seat doesn’t release easily:
Make sure you’re fully pressing the release button. You may need to use both hands or lean over the seat to apply enough pressure. Press firmly down on the carrier as you squeeze the release. This takes tension off the latch.
Rigid LATCH blockers:
If the base is attached via rigid LATCH, the connectors can flare outward. Press both sides of the rigid LATCH release levers toward each other as you pull the base forward. This will free the base.
Stability leg is down:
Many PIPA series bases include a stability (load) leg. If the leg is extended, it shouldn’t prevent seat removal. Still, make sure it’s locked and positioned correctly per the manual (Nuna PIPA Series Base manual).
Belt lock-off engaged:
When installed with the vehicle seat belt, lift the base’s lock-off release (usually a small lever or button) before unbuckling. An engaged lock-off can trap the base.
Fabric caught:
Seat fabric can sometimes catch on the base shell. Gently wiggle the seat from side to side while pulling up to free any trapped edges.
Manufacturer defect:
If the release looks broken or feels extremely stiff, stop using the seat and contact Nuna’s customer service. Never try to repair it yourself. Nuna provides support for replacement parts if something is damaged.
If the infant seat still won’t come out, take a deep breath and recheck the manual. Every seat must detach; just make sure you’re following the correct method for your specific model.
Removing the Nuna Base
Nuna infant bases are typically left in the car unless you need to move them. If you do need to remove the base (for example, when changing vehicles or cleaning), follow these general steps. Many Nuna bases use rigid LATCH connectors (highlighted in green in the photo above) or seat belts to stay secured.
- For Rigid LATCH installation: Press the rigid LATCH release levers (often pull them toward each other) while pushing the base into the vehicle seat. Then pull the entire base straight out.
- For seat belt installation: Lift the base’s lock-off release (usually a small lever or button) to unlock the belt, then unbuckle the belt. Remove the shoulder and lap belts from the base.
Once the base is free, you can remove the Nuna car seat using the steps above. Remember to reinstall the base (or keep it securely stored) before driving again.
Frequently Asked Questions (FAQs)
Can I remove the Nuna car seat from its base with my baby still inside?
Yes. Nuna car seats like the PIPA and PIPA Lite are designed to let you remove the seat from its base while your baby is safely buckled inside.
Is it normal if the Nuna car seat feels stuck on the base?
It’s not unusual. Sometimes the release button needs a firmer press, or the base and seat may be slightly misaligned. Wiggle gently and check for debris under the seat or around the latch before trying again.
Can I travel with my Nuna car seat without the base?
Yes, certain models are designed for baseless installation using the vehicle seat belt, including the PIPA, PIPA RX, and PIPA Lite RX. Other Lite variants (PIPA Lite, Lite LX, Lite R) require the base and cannot be installed without it (Nuna FAQ, accessed 2025-09-22).
What’s the easiest Nuna car seat to remove from its base?
The Nuna PIPA RX with the RELX base offers smooth detachment thanks to its upgraded release system and ease-of-use features (PIPA RX manual).
How do I know the car seat is securely reattached after removal?
When the car seat snaps back into the base, you should hear a loud “click.” Give it a firm tug near the foot area. If it doesn’t move, you’re all set (per Nuna manuals).
What if the release button doesn’t work even after cleaning?
This may indicate a defect or damage in the mechanism. Contact Nuna support or the retailer if your product is still under warranty. Avoid DIY fixes, as they can void the warranty or compromise safety.
Conclusion
Once you know how to remove a Nuna car seat from its base, it becomes second nature. After a few practice runs (even without your little one in it), you’ll build the confidence and speed to handle daily routines with ease. Whether you’re heading to a doctor’s appointment, catching a flight, or moving the seat to grandma’s car, you’ll know exactly what to do.
It’s not just about convenience. It’s about making sure your child is safe and secure on every ride. Take a deep breath, trust the process, and let your Nuna seat do what it’s built to do: make parenting a little easier.


3 thoughts on “How to Remove a Nuna Car Seat from Its Base (Easy Guide)”